… on an Epson V700 scanner.
This guide is meant to be a starting point to someone starting out scanning negatives or slides themselves in 2019.
I do advise you up front to get in touch with a lab and build a relationship with them. The quality of a scan from a professional photo lab will always be way ahead of the quality of a flatbed scanner. That being said if you scan at home you have more control over the colours and handle the film as you wish.
I have used Vuescan, Silverfast and Epson Scan in the past. In the end I settled on Epson Scan. It just seems to work for me. And as usual in photography finding something that works for you and develop it, refining it more and more is key.
First off if you wish to get the optimum sharpness from your scans I advise you to do the following:
Flattening negatives and slides in a heavy, clean book makes scanning them much easier.
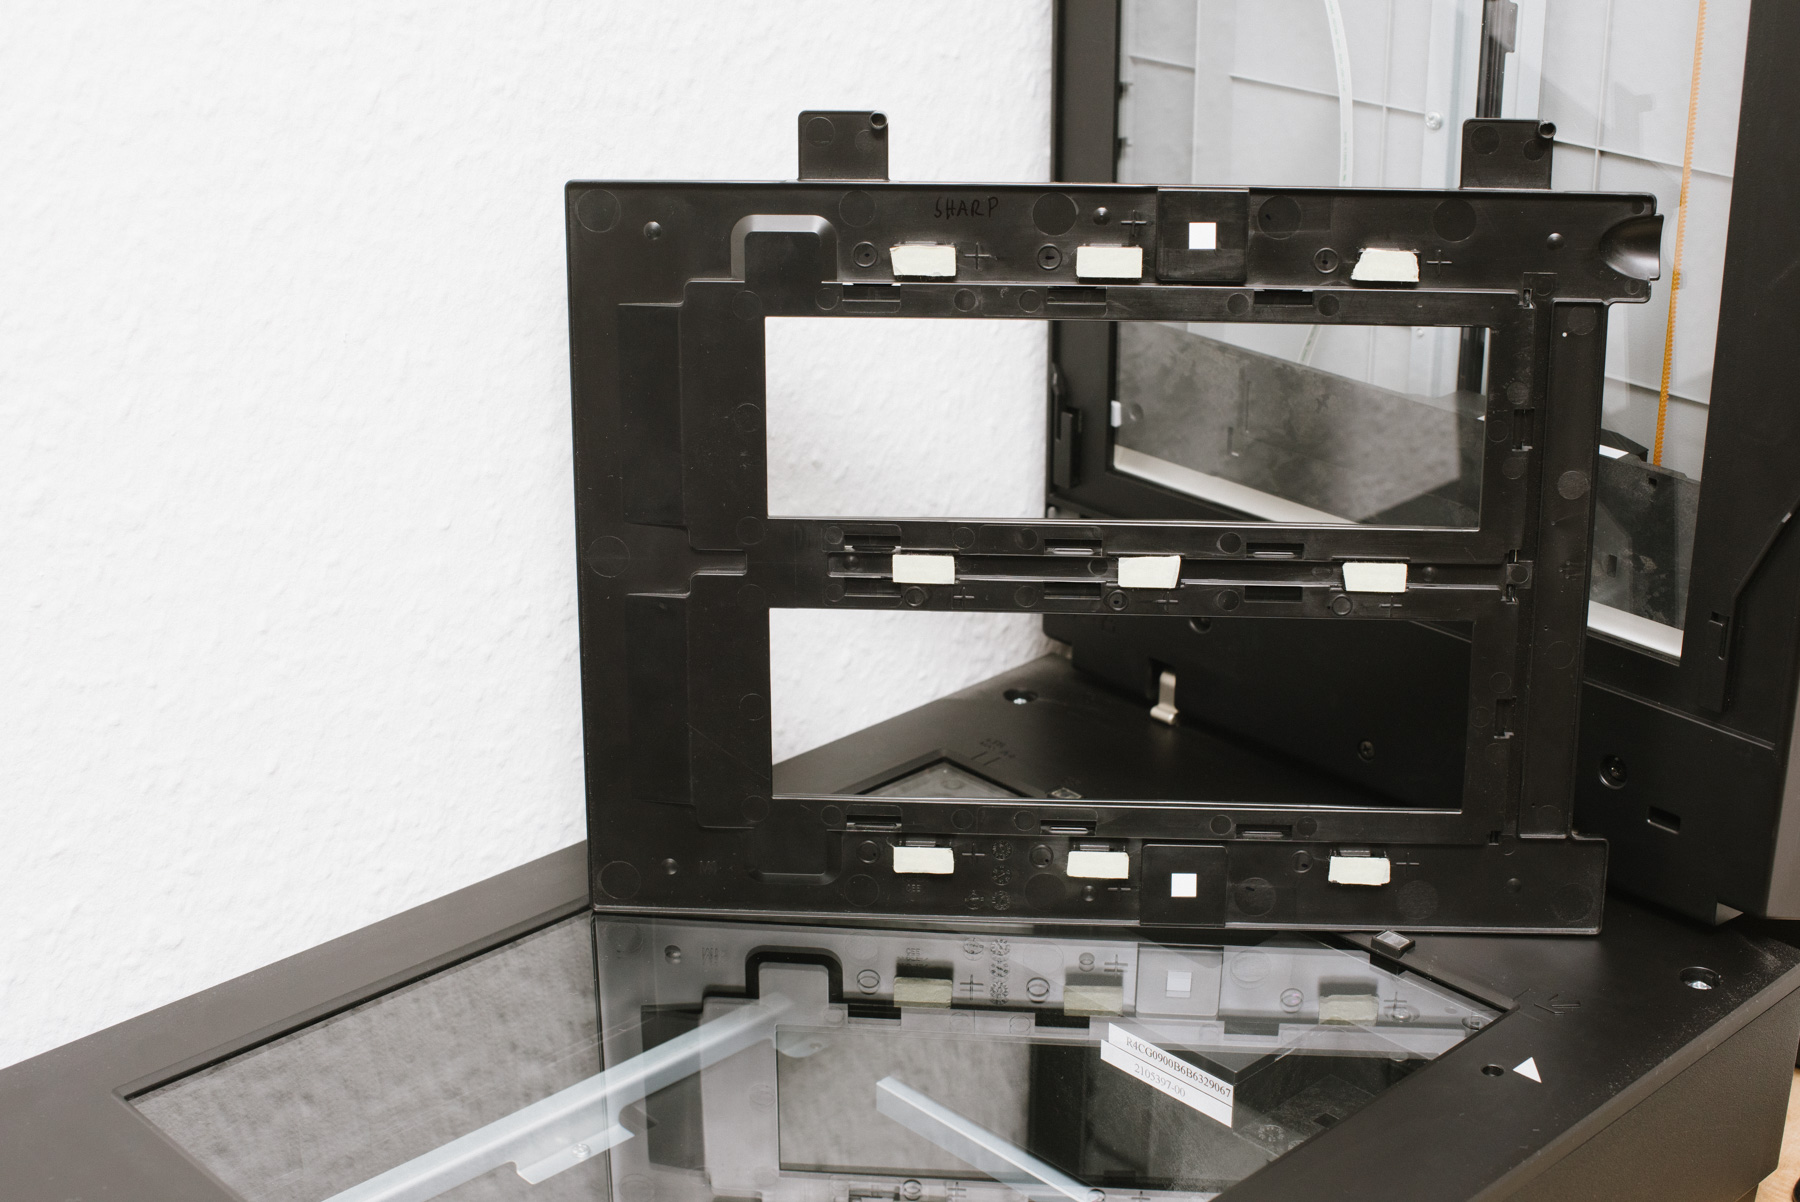
Find the optimal height of your epson film holders. To get the hight perfectly right I like to use the distance-plugs and small strips of masking tape. First take a very flat negative and place it in the epson film holder. Then make a first scan. Then adjust the little “distance-plugs” that are on the bottom side of the holder. Make sure to name each scan acoordingly to the distance-plug you used. For Example “Test-Scan-Arrow-Up” or “Test-Scan-Arrow-Down”. Then use strips of painters masking tape (the yellow one) and stick it on the little plugs (see photo below). After pressing firmly on each one of the newly adjusted plugs, make a scan. Afterwards compare your scans in your photo library and remember not to sharpen them while importing. Now you will have found the optimum height of the holder you are using. For me this is Arrow up + three strips of masking tape (see photo). I cannot recommend this advice highly enough as it completely changed the look of my scans.
Store your negatives in archival paper or plastic pages. Before scanning put them in a heavy book and store them for a few days. This way your negative will be completely flat.
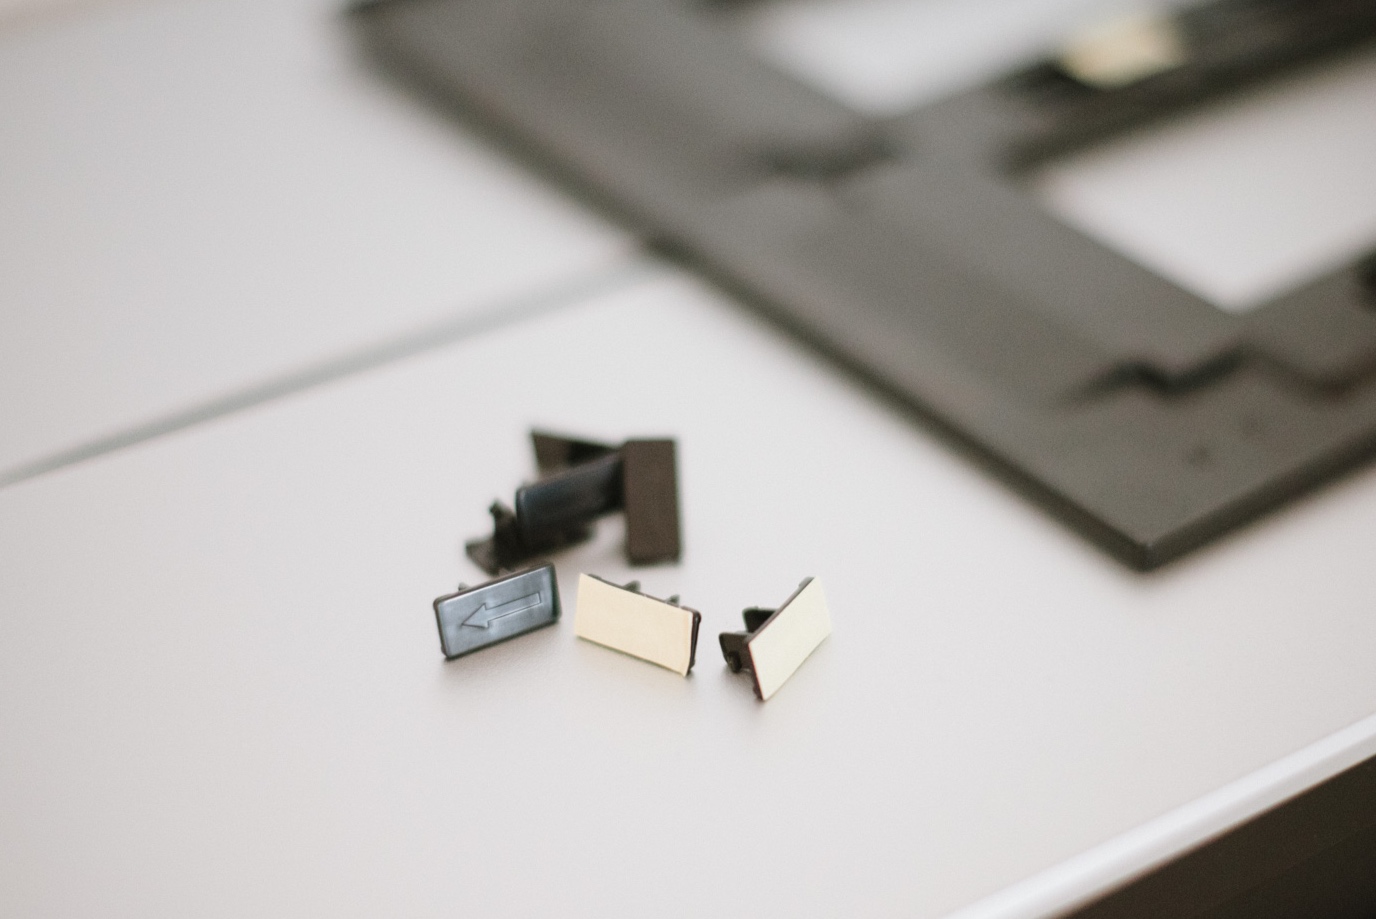
Please also note that there are different original Epson film holders out there. They look identical, however I have found that they can have different closing ”stubs”. These if broad lead to a feeling of nearly breaking the mask when closing it. Also it leads to extremely curly film thats why I call it “Curl Clip mask”. The other one “Easy clip mask” has very thin stubs. This mask will close very easily and you can still adjust the film.
Original Epson Film Holders can have different closing mechanisms.
Epson Scan Professional Mode Settings for Negative and Slide film
Okay, so now you can get really sharp scans. Wonderful.
Before we get into the software part, some preparation will be quite helpful. Be sure to clean the scanner glass of dust. Especially the area close to the top is crucial. If you leave dust there, it may cause you to get long distracting lines on your scan. This will sometimes not be very apparent at first sight. However if you make a print it will show.
If you are shooting film, I guess you love the colours it gives you. Those colours that are quite difficult to get right at home. So open up the Epson Scan Software and let’s get to it:
In this example I chose a negative overexposed by one stop. It is a Medium format negative image on Kodak Portra 400 shot on a Mamiya 6 Rangefinder Camera.
In Epson Scan change to Professional Mode. My Setup is in German, however the settings are placed in the same position in each language. There are a lot of discussions on how and why you should select a certain resolution and after reading a whole lot about it I settled on these settings. Concerning the dpi if you go over 2600 dpi everything is interpolated (pixels from the scan are just repeated), it takes longer to scan and you can do the same in Photoshop later.
I would recommend that you avoid the clickable settings like “unsharpen” etc, because they change the endresult irreversibly. For example ICE does reduce the amount of dust on your scans. But it also reduces the sharpness. So it is up to you: Do you need to clone out a lot of dust? Can you accept the decrease in sharpness?
It is helpful to get to know these settings but in the end they are not really necessary to get a good scan.
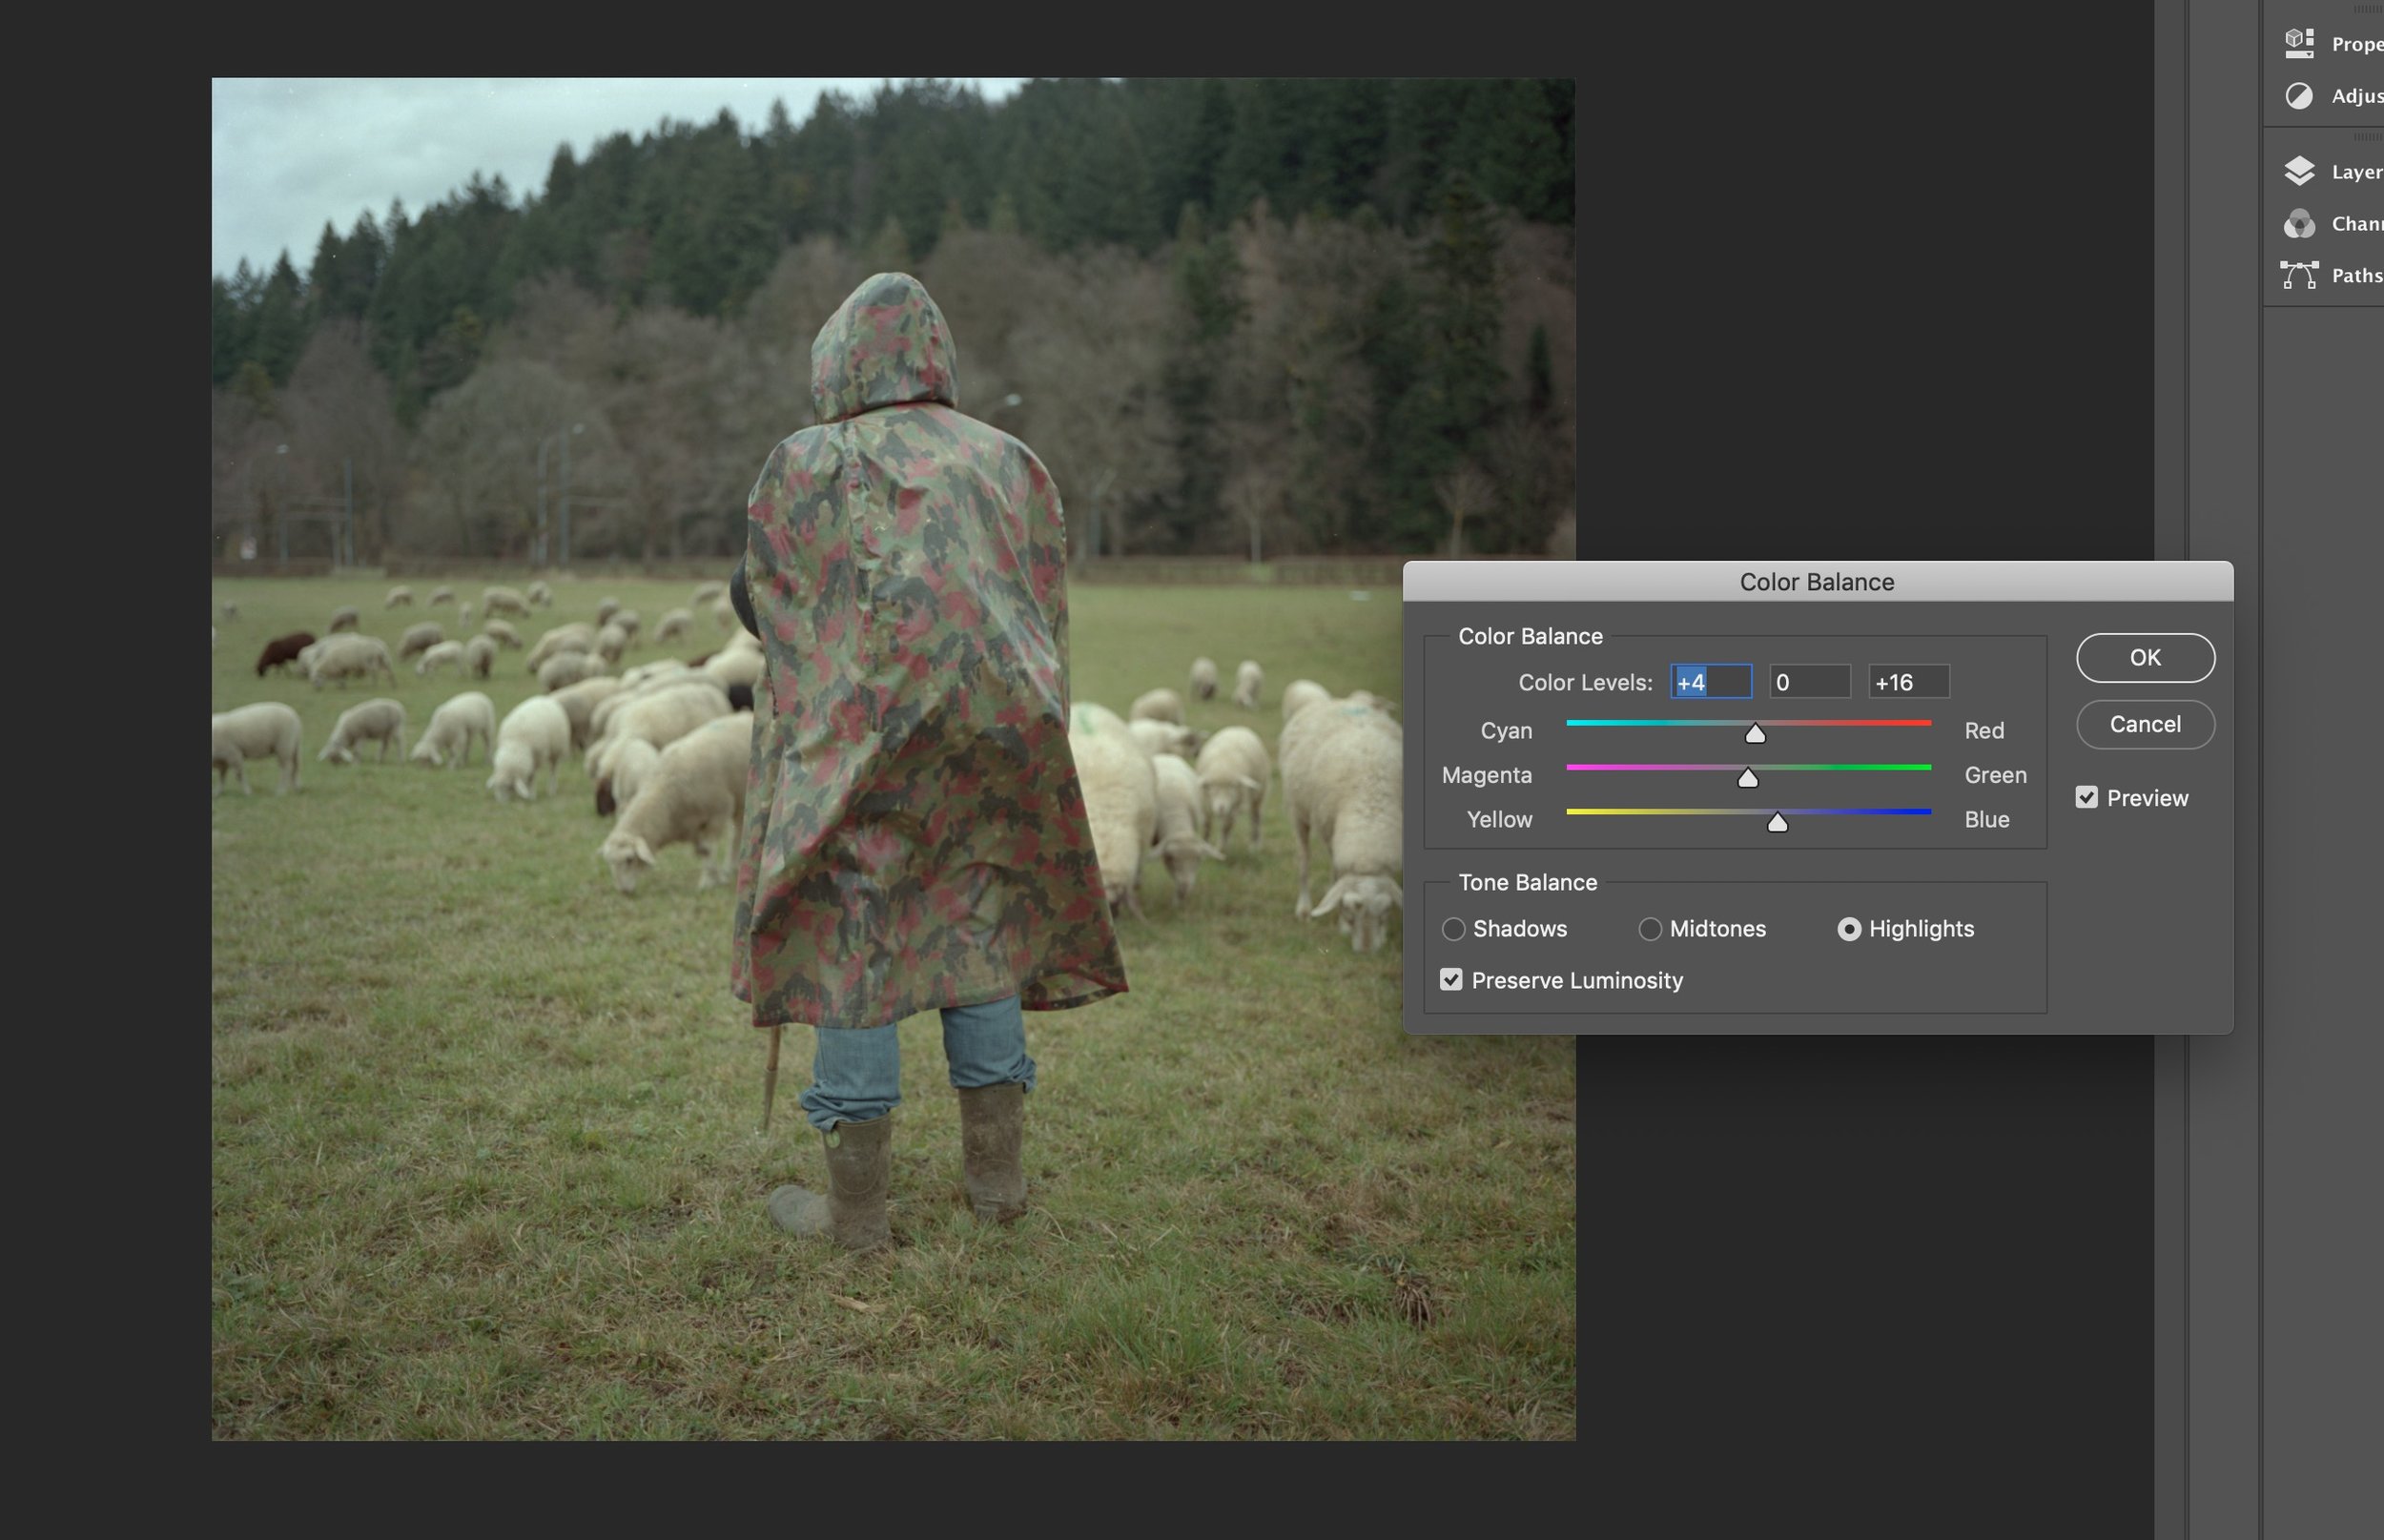
Next is one of the most important parts to get the colours right. Set up the rest of the settings by clicking on “Configuration…”. If you installed the CD version of Silverfast or installed a free Demo from their website , you will find the official colourprofiles in the folder Macintosh HD/Library/ColorSync/Profiles . They are named SF for Silverfast. Pro for Professional. T for Transparent, this meaning analogue film (slide or negative). Select the correct one “SFproT (perfectionV700)“ for your Epson Scanner and click okay. Select Output Adobe RGB, as this is the colourspace most people and printers use.
So why is it important to set this colour profile? Simply put - it gives you different and more precise colours. Compare it to the standard colour profile and you will be surprised how your scans can look.
You can select how good the quality of the preview should be under preview. If you use the automatic miniature Preview you can set the format of your film now. However I suggest you crop the frame yourself. As with many things in analogue photography: You pay a lot of money and attention to get the photo you envision, so why would you allow your frame to be cropped inaccurately by the software?
Alrighty, let’s click on the “folder and a photo”-image-button next to “Scanning”. Here you can set your output file. I recommend you use Tiff. TIFFs are easy to work with in PS and Lightroom. And you can change up the results more easily compared to a jpeg if you change your mind a few months later. I usually use a name like “Month-Year-Filmtype-001”. Turn the compression off and turn the ICC profile option on under “Options…”.
You waited long enough for this. Now click on Preview!
Selecting the right colour profile is crucial for stunning colours.
Name and File Settings for your scan.
Your preview loaded. Epson Scan on the mac does not automatically use all the space that is given, so why not enlarge that Preview window to give you a better view of your lovely negative?!
Make a smaller than the actual frame selection and click on Auto exposure Button (Round ball with two arrows pointing at it).
In the preview make a small selection inside the frame and click “auto exposure”.
It normally gives you a nice, contrasty image. But this comes at a price… Open up the Histogram and get ready to change some sliders!
Change the Output dark sliders to 0 and the Output White slider to 255 (arrows for Output/Ausgang). Make sure to adjust the arrows for Input/Eingang as well.
Now I only recently found this out, but adjusting the input sliders on the histogram does not show you what you will actually get! To see what kind of data you are scanning and what the histogram will look like click on the inconspicuous button “Show Output” (Ausgabe anzeigen). See in the images below how different the histograms are:
Normal / Input Histogram
Output Histogram. Set your sliders while in normal mode, next click on Show Output to see what you will get.
Moving on you set the Output values to 0 / 255. Then slide the white point sliders in the histogram to the right until it reaches the end. Then adjust the black point to the left side. Now using the Show Output Button you can check if you have no clipped blacks and then you are done adjusting! To fine tune, Check that the output values for each individual channel (red, green or blue) are not clipped.
Enlarge your selection and press Scan!
As a follow up you can do some small adjustments in Photoshop and Lightroom.
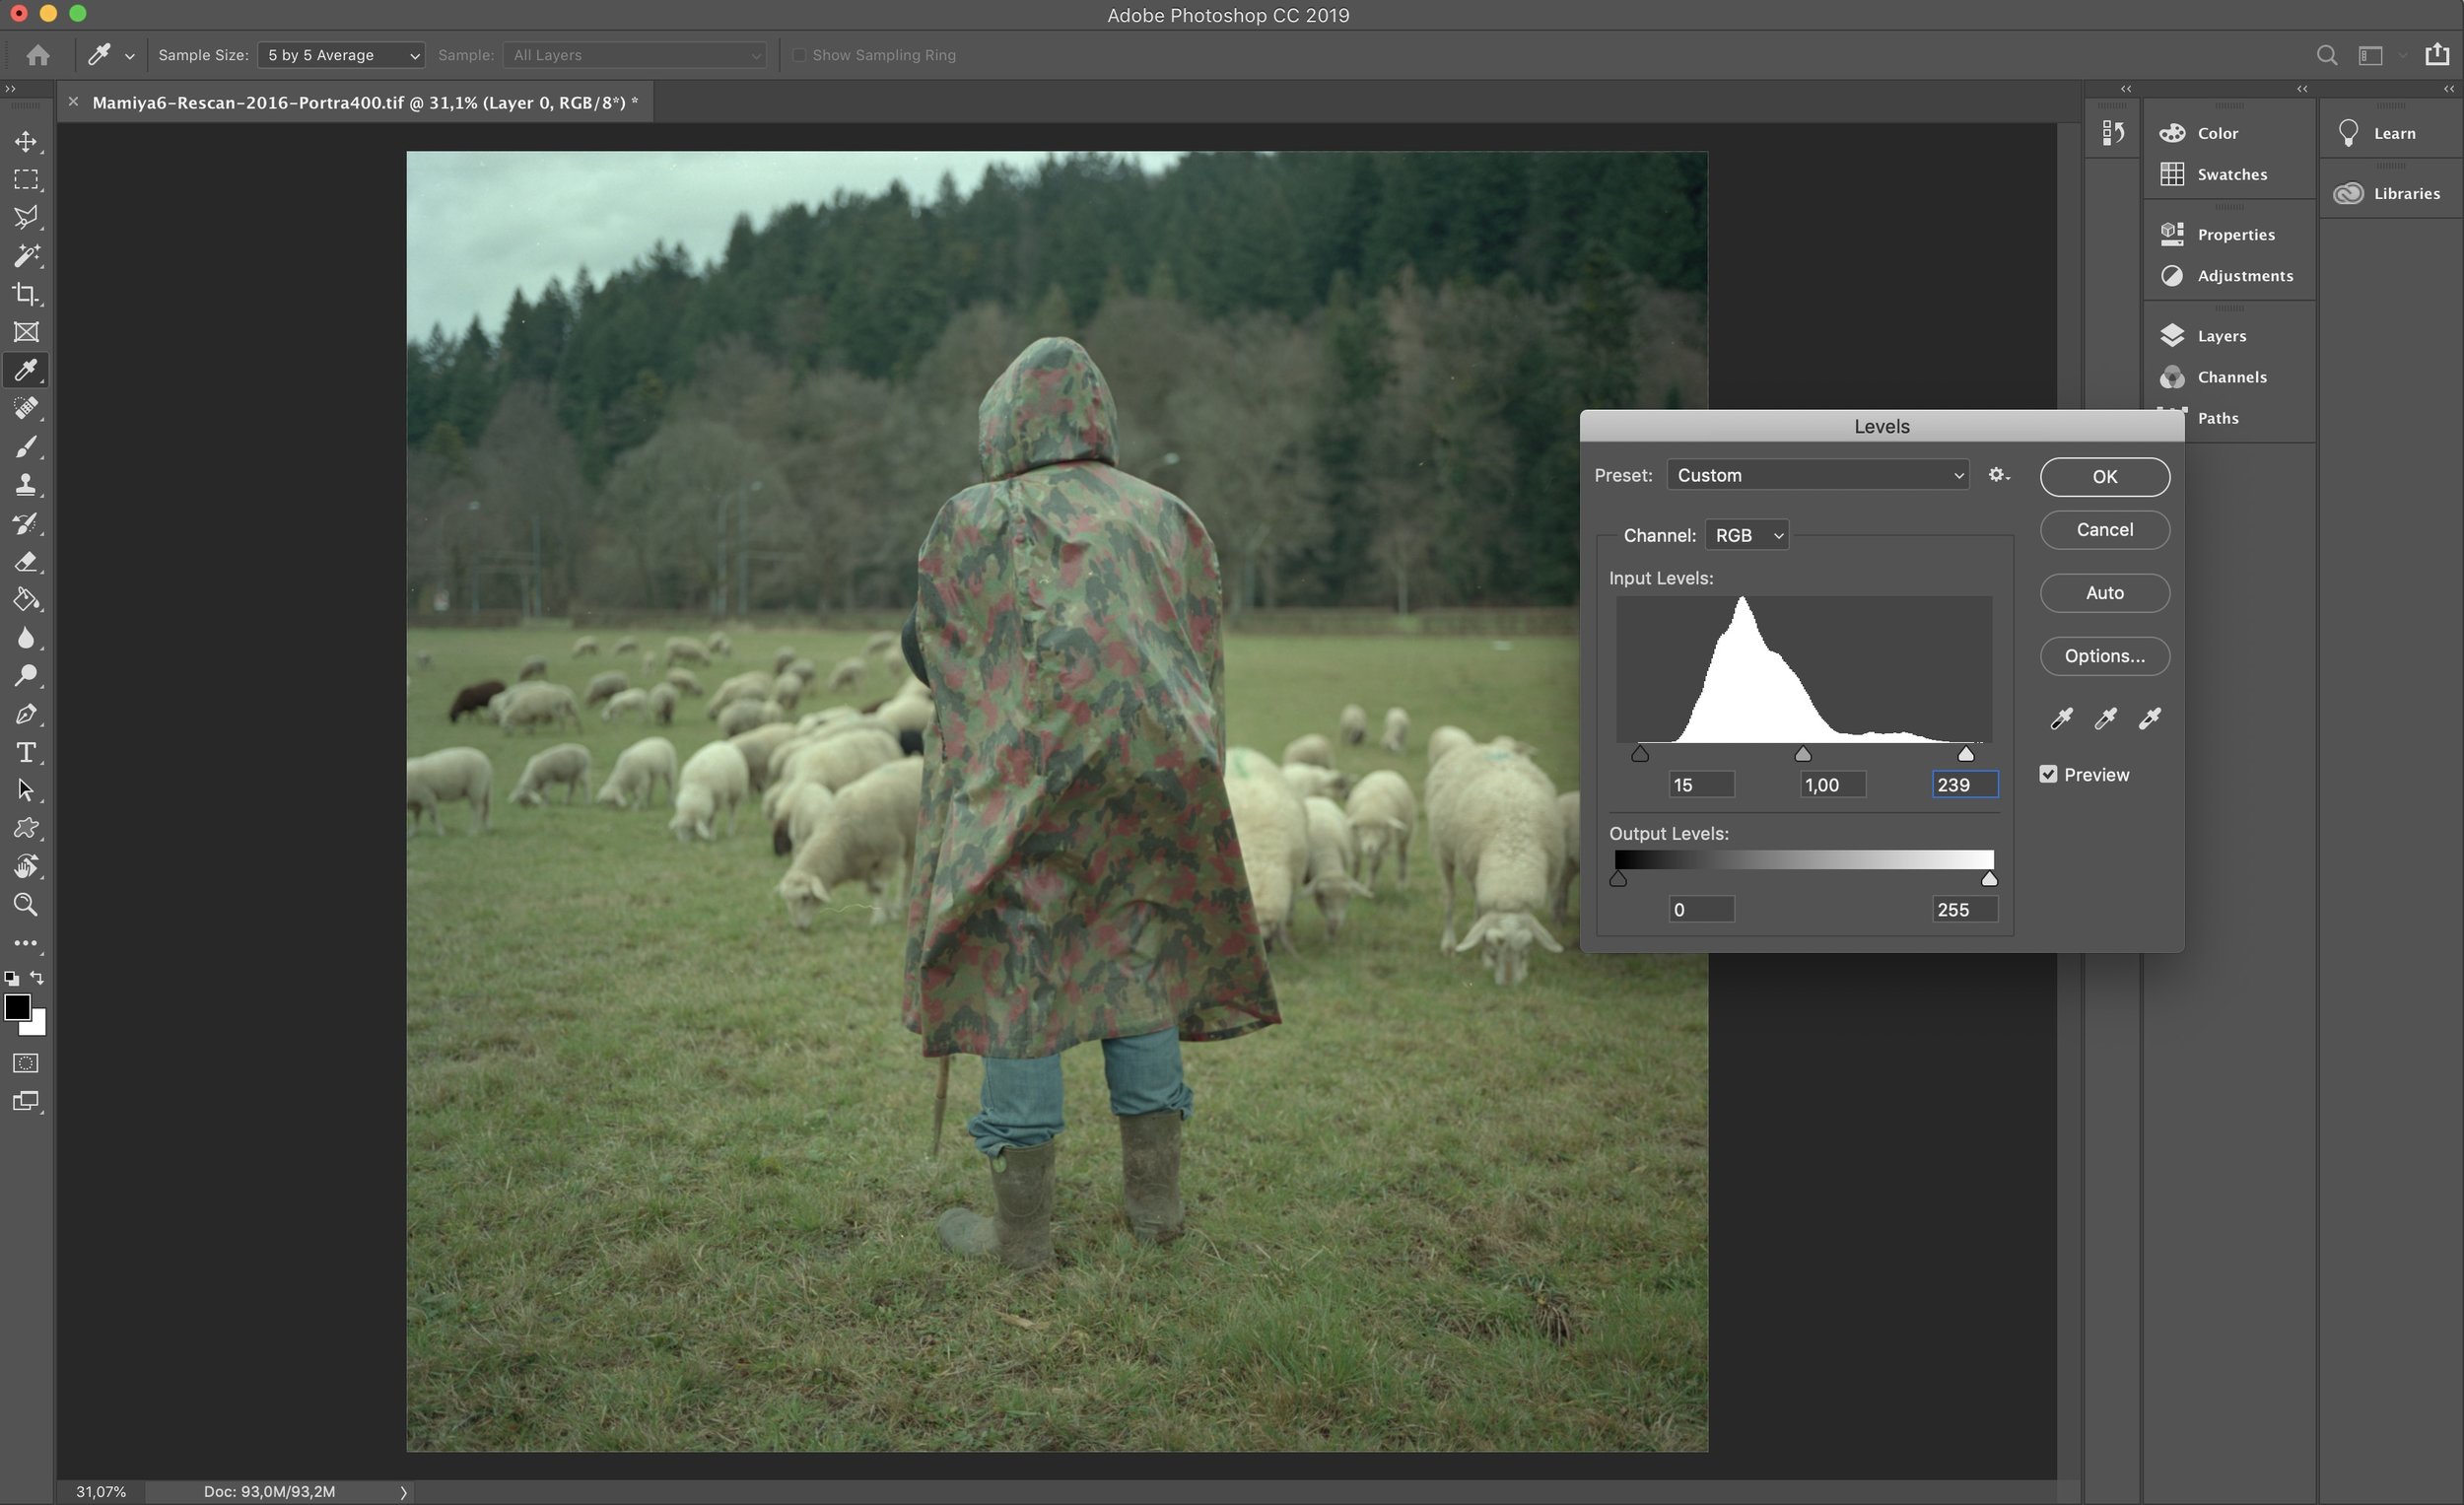
First open up the TIFF Scan in Photoshop and crop out any left over black edges.
Then open the Levels and adjust while holding down the option-key on the mac. This allows you to see directly when the first clipping is made.
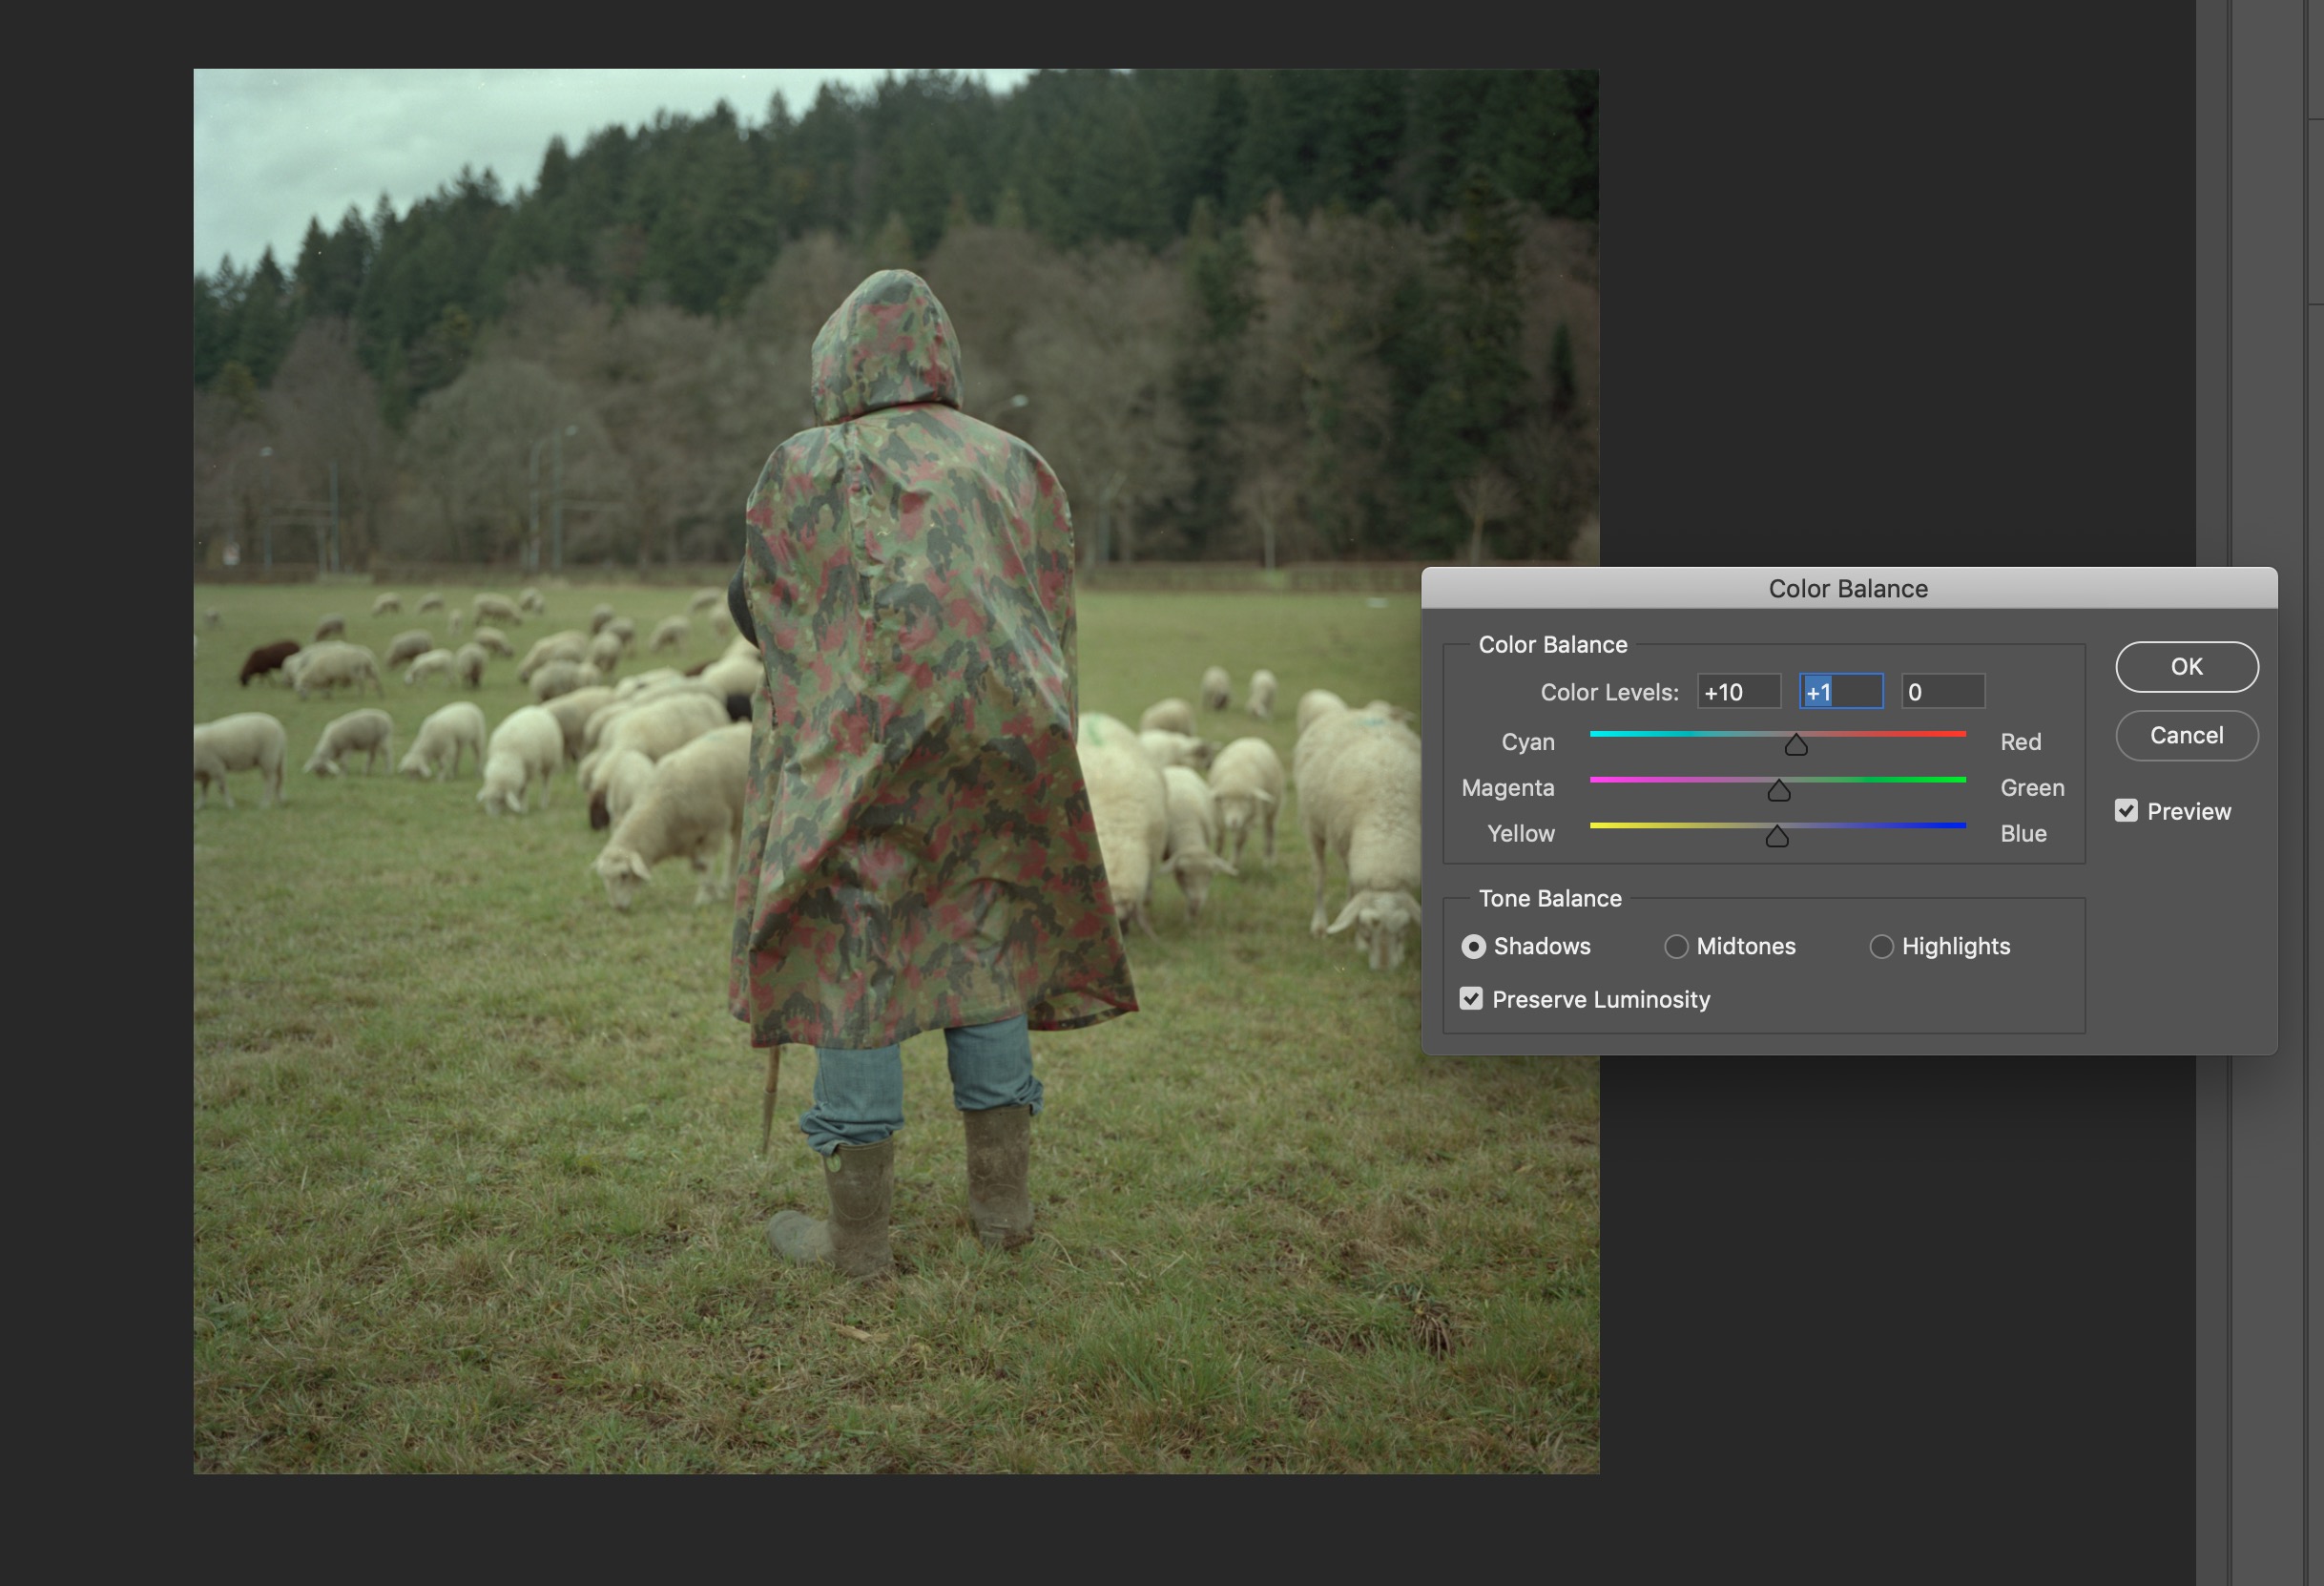
Now onto the difficult part. Open up the Color Balance. This is something that will take you some time to figure out as it is personal taste. Look at the image in front of you and ask yourself:
What colour cast is present? How do the shadows feel? Are they very cold? Are they warm? Do you want them to look warm?
I find that adjusting and even playing with the Shadow and Highlight colour balance can very easily show you what you want. Your eyes will tell you.
Save the file as TIFF with compression LZW and discard the Layers.
I do some final adjustments in Lightroom (see below) like exposure, black point, white point and sharpening. Because I do it in Lightroom the rather flat scan from Photoshop will not be changed itself. Only when I export all the adjustments are implemented.
Final adjustments in Lightroom.
Scanning at home on a flatbed scanner is a skill and can be a challenge. I do hope that you will have an easier time using this guide. For some follow up reading: Sebastian Schlüter writes up some very interesting and helpful blogposts. Also a lot of good stuff can be read on Alex Burke’s Website.
Thanks for reading & happy Scanning
Max
Do you have anything positive to add that will help others? Write a comment!